Music Mastering Online: Essential Pre-Upload Checklist
MuseGen Team
5/6/2026
Uploading a track for music mastering online can feel like sending your "final exam" to a grader you'll never meet. You're excited - but also wondering: Did I leave enough headroom? Did I export the right version? Will streaming turn it down or distort it? I've been there, and the fastest way to get a great master (with fewer back-and-forth emails) is a tight, repeatable pre-upload checklist.
What "music mastering online" actually needs from you (and what it doesn't)
Music mastering online is still mastering: the final polish and quality control stage that makes your mix translate across earbuds, cars, club systems, and streaming platforms. Mixing balances tracks; mastering optimizes the stereo mix (or stems) for release, consistency, and technical compliance. Most online mastering engineers and AI mastering tools can work quickly - but only if the premaster you upload is clean, correctly exported, and clearly labeled.
If you do just one thing: separate your "loud rough" from your "clean premaster." The rough is for vibe; the premaster is for sound quality and headroom. That single habit prevents the #1 online mastering mistake I see: accidentally uploading the limited/clipped version.
Step-by-step: Pre-upload checklist for music mastering online
1) Confirm you're exporting the approved mix (not an old bounce)
Before you hit export, open the final mix session and verify it's the version you actually signed off on. I've personally uploaded the wrong "v3" before (same name, slightly different vocal ride), and the fix cost more time than the mastering itself. Quick checks that save you later:
- Start to finish playback: intro, transitions, and ending tail
- No accidental mutes/solos
- No clicks, pops, or weird edits at crossfades
- Correct tempo feel and arrangement (especially if you printed automation)
2) Remove master-bus processing unless it's intentional (and disclosed)
For most music mastering online services, you should export without master-bus limiters, clippers, maximizers, or heavy compression - so the engineer (or algorithm) has room to work. If your master-bus chain is part of the sound (common in EDM/hip-hop), export two versions:
- Clean premaster (preferred for mastering)
- Reference loud mix (so the mastering target matches your intent)
3) Hit safe headroom: peak around -3 to -6 dBFS
Aim for peaks roughly -3 dBFS to -6 dBFS with no clipping anywhere. This headroom gives online mastering processing space for EQ moves, transient control, and limiting without distortion. If you're already at 0 dBFS, you're forcing the mastering stage to "undo" problems before improving anything.
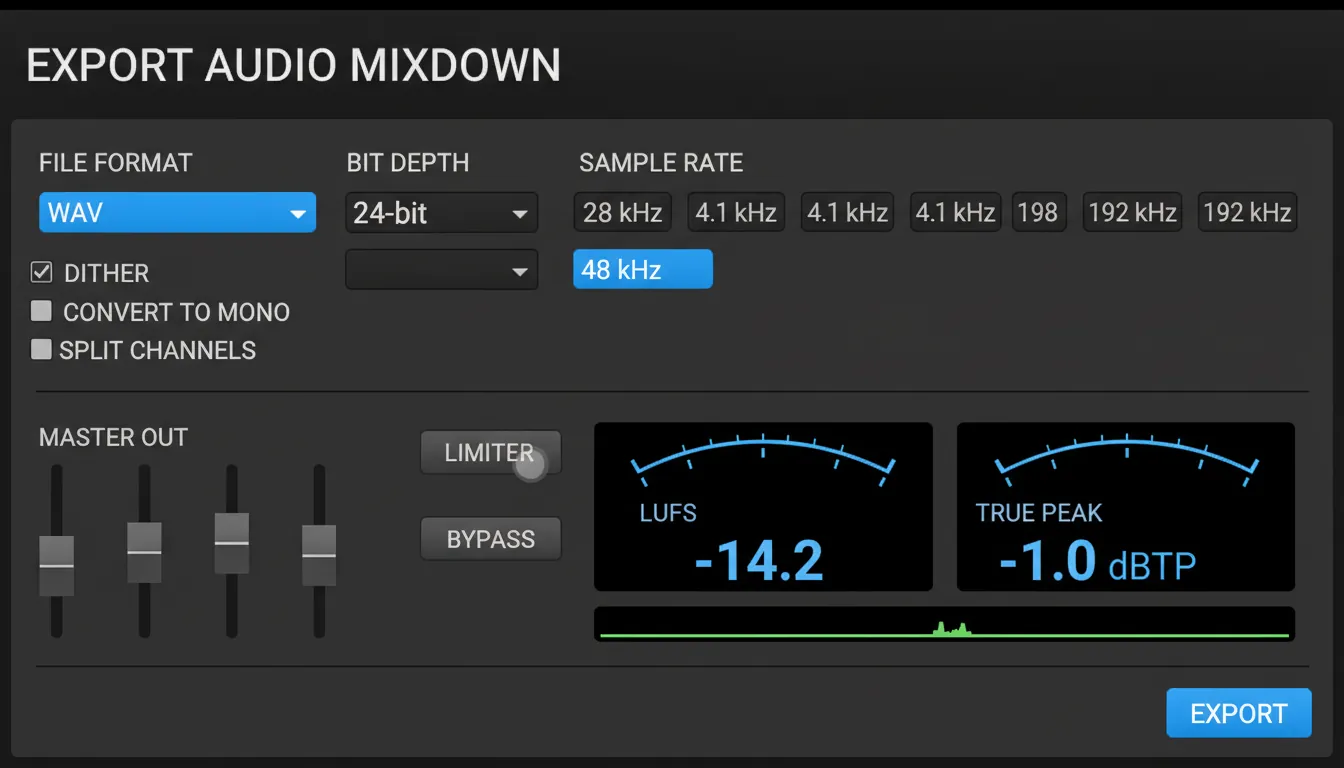
4) Export in the right format (don't send MP3 as your source)
For music mastering online, upload a lossless file so you're not mastering compression artifacts.
- Format: WAV or AIFF
- Bit depth: 24-bit (common and safe for delivery)
- Sample rate: match your session (often 44.1 kHz or 48 kHz)
- Bounce type: stereo interleaved
- Avoid: normalization, MP3/AAC as the main source
5) Loudness targets: use them as guardrails, not a religion
Streaming normalization means "louder" often just gets turned down - sometimes making distortion more obvious. Many platforms normalize near -14 LUFS and recommend -1.0 dBTP true peak (varies by service and content). Your best move is to prioritize clarity, punch, and translation, then keep true peaks safe to avoid codec overs.
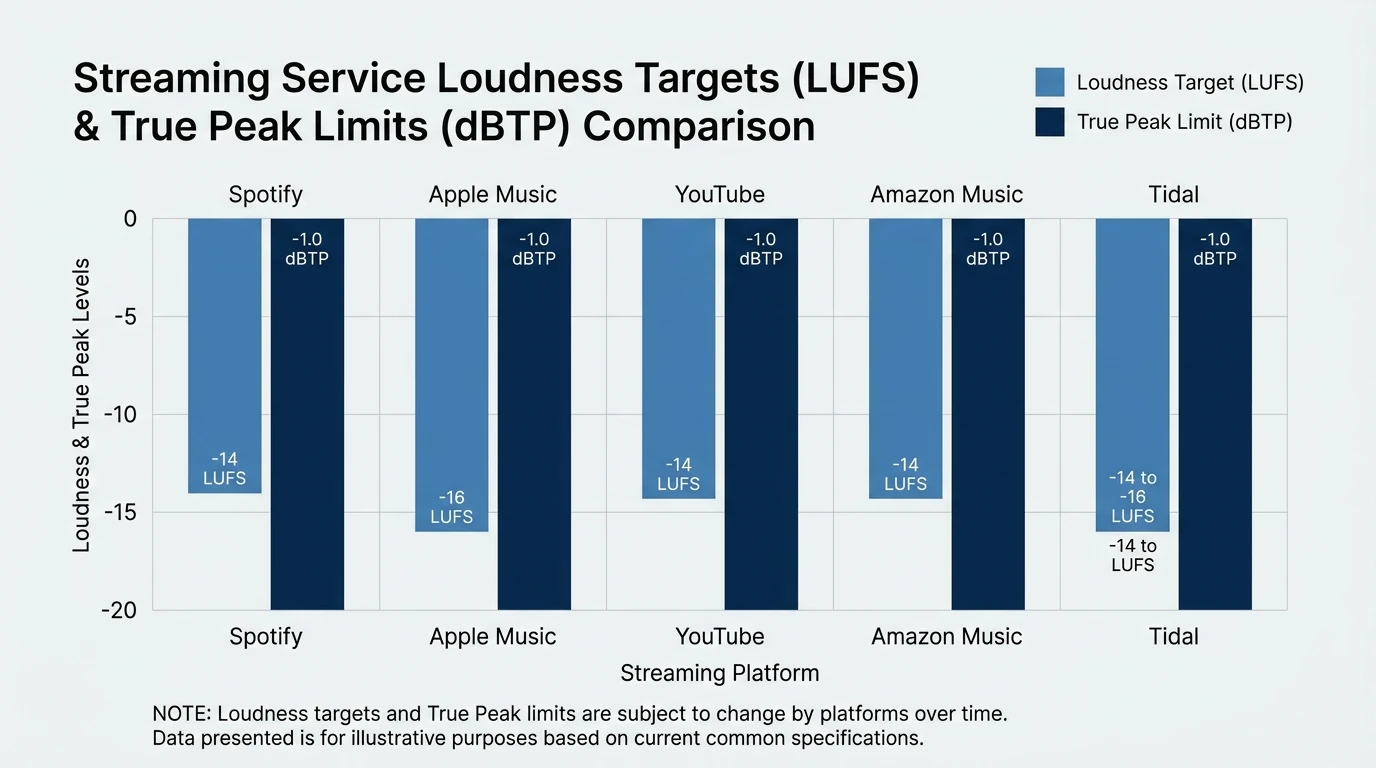
6) Check true peak (not just sample peak) to prevent streaming distortion
True peak is where many "sounds fine in my DAW" masters fall apart after encoding. If your limiter only shows sample peak, you may still clip after AAC/MP3/Opus conversion. A practical pre-upload rule for online mastering: keep true peak at or below -1.0 dBTP unless your engineer requests otherwise.
7) Dither only when you're delivering 16-bit (and only once)
If you're exporting a 24-bit premaster for music mastering online, you typically do not need to dither. Dither is mainly for the final step when reducing bit depth (e.g., 24-bit -> 16-bit for CD). Apply it once at the end - double-dithering is avoidable noise.
8) Include alternate versions (future you will thank you)
If you might need licensing, sync, clean edits, or social cutdowns, package them now. Common adds:
- Instrumental
- Acapella (if available)
- Clean/radio edit
- Explicit
- Short edit (15s/30s/60s)
9) Name files like a pro (so nobody masters the wrong version)
Clear naming prevents mix-ups across email threads, portals, and revisions. Use a consistent pattern with versioning, bit depth, and sample rate.
Example:
Artist_TrackTitle_Mix_v7_24bit_48k.wavArtist_TrackTitle_Instrumental_v7_24bit_48k.wav
10) Package and upload securely (ZIP + portal/cloud link)
Put your premaster(s), references, and notes into one folder, ZIP it, and upload via the service's portal (or a reputable cloud link). This reduces missing files and keeps everything tied to the same revision.
Quick reference table: Online mastering delivery settings (recommended)
| Item | Best Practice for Music Mastering Online | Why it matters | | ----------------- | ----------------------------------------- | --------------------------------------- | | Source file | WAV or AIFF (lossless) | Avoids mastering MP3 artifacts | | Bit depth | 24-bit | More headroom and detail for processing | | Sample rate | Same as session (44.1k/48k common) | Prevents unnecessary SRC issues | | Peak level | Peaks around -3 to -6 dBFS | Gives mastering room to work | | Master bus | No limiter/clipper (or export 2 versions) | Prevents baked-in distortion | | Normalization | Off | Keeps level decisions intentional | | Metering | LUFS + True Peak | Better streaming translation | | True peak ceiling | <= -1.0 dBTP (typical safe target) | Reduces codec clipping risk | | References | 1-3 reference tracks + your loud rough | Communicates tone and energy | | Delivery | ZIP via secure portal/Drive/Dropbox | Prevents missing/wrong files |
My "90-second QC pass" before I upload
When I'm in a rush, I do this mini-routine before music mastering online submission. It catches most fail states without overthinking.
- Start playback at 0:00 and listen to the first 10 seconds for clicks/noise.
- Jump to the loudest chorus/drop and confirm no red lights (clipping).
- Check ending tail for a clean fade and no cut-off reverb.
- Confirm export is WAV/AIFF 24-bit and matches session sample rate.
- Verify filename includes version number and "Mix" vs "Ref Loud."
Choosing an online mastering route: AI vs human vs hybrid
Online mastering isn't one-size-fits-all. Here's how I recommend deciding:
- AI mastering: fastest for demos, content schedules, and quick iteration. Great when your mix is already solid and you need speed.
- Human online mastering engineer: best for nuanced genres, album sequencing, tricky dynamics, and when you want feedback.
- Hybrid (AI first pass + human final): efficient when you need rapid previews, then final polish and consistency.
If you're producing with MuseGen, a practical workflow is: generate/edit stems -> do a clean mix export -> run a mastering preview -> then commit to a final master version for release and alternates.
LUFS Explained - SIMPLE! (Mastering for Spotify)
Delivery notes template (copy/paste)
Include a small text file in your ZIP. This improves results for music mastering online - especially with human engineers.
- Artist:
- Track title:
- Version (v#):
- Tempo/BPM:
- Key (if known):
- Genre / vibe:
- Intended platforms (Spotify/YouTube/Bandcamp/etc.):
- Reference links (1-3):
- Notes: "Please keep transients punchy," "vocal forward," "avoid harsh 3-5 kHz," etc.
Common upload mistakes (and how to avoid them)
- Uploading an MP3: always send WAV/AIFF unless there's truly no alternative.
- Accidental limiter left on: export a clean premaster + loud reference.
- Wrong sample rate conversion: keep session sample rate unless requested.
- Chasing a single LUFS number: optimize sound and true peak safety, then check normalization behavior.
- No version control: include v-numbers in filenames and notes.
Conclusion: Upload like your mastering depends on it (because it does)
At the last moment before you hit "upload," your track is basically asking for one thing: give me room to become great. With music mastering online, the best results come from clean exports, sensible headroom, lossless files, and clear communication - so the mastering stage can enhance instead of repair. If you follow the checklist above, you'll spend less time on revisions and more time releasing music that translates everywhere.
FAQ: Music mastering online (search questions)
1) What file type should I upload for music mastering online?
Upload a lossless WAV or AIFF, ideally 24-bit, at your session sample rate.
2) Should I put a limiter on my master bus before online mastering?
Usually no. Export a clean premaster; optionally include a loud reference version to show your intended energy.
3) How much headroom do I need before I send a premaster?
A common safe range is peaks around -3 to -6 dBFS, with no clipping.
4) Is -14 LUFS the correct target for every streaming platform?
Not exactly. Many services normalize near -14 LUFS, but good mastering balances loudness with dynamics, distortion, and translation.
5) What true peak should I aim for to avoid distortion after upload?
A typical safe target is <= -1.0 dBTP to reduce codec clipping risk on streaming.
6) Should I dither my premaster before uploading?
If you're delivering 24-bit, typically no. Dither is mainly for final 16-bit delivery and should be applied once.
7) Do I need separate masters for Spotify, YouTube, and Apple Music?
Often, one well-balanced master works fine. Separate versions can help in edge cases, but consistency and clean true-peak control usually matter more.