What Is a Vocal Chain in Music? Plugin Order and Settings Explained

MuseGen Team
8/31/2026
You recorded a decent vocal. You dropped an EQ, a compressor, and a reverb on it. And somehow it still sounds like a voice sitting on top of the beat instead of living inside it — thin in the verses, harsh on every "s", buried the moment the chorus hits. The plug-ins usually aren't the problem. The order is. Here's what a vocal chain actually is, why sequence changes the sound, and where to start with every setting.

In short
A vocal chain is the ordered series of processors a recorded vocal passes through during mixing. Signal enters the first device and leaves the last one changed by everything before it — so the order isn't housekeeping, it's part of the sound. The standard sequence: clean-up → subtractive EQ → de-esser → compression → saturation → tonal EQ → delay and reverb on sends.
Quick facts
- What it is: The ordered set of processors a vocal runs through when mixing.
- Standard order: Clean-up · EQ cuts · de-ess · compress · saturate · EQ boosts · effects.
- Core four: EQ, compressor, de-esser, reverb — all stock in every DAW.
- Guiding rule: Remove problems first, control dynamics second, shape tone last.
- Effects go: On aux sends, not inserted on the vocal track.
- Biggest mistake: Mixing the vocal soloed instead of against the full track.
- Settings are: Starting points to adjust by ear, never fixed presets.
What a vocal chain is
A vocal chain is the ordered series of processors a recorded vocal passes through on its way to the mix. The name is literal: each device is a link, and the signal travels through them in sequence. Whatever the first plug-in outputs is what the second one receives, which means every stage inherits the decisions made before it.
In one line: the input is a raw recorded vocal, the output is a vocal that sits in the track — steady in level, clear in tone, and sitting at a believable distance. The chain is just the route between those two states, and the order of the route is part of the result.
That's the piece beginners usually miss. People treat a chain as a shopping list — get an EQ, get a compressor, get a reverb — when it's really a sequence of decisions. The same four plug-ins with identical settings in two different orders produce two audibly different vocals. Not slightly different: different enough that one sits and one doesn't.
A chain also isn't a preset you paste onto every song. Voices differ enormously in weight, brightness, and consistency, and a chain built for a breathy pop vocal will strangle a loud rock one. What transfers between songs is the order and the reasoning. The numbers get dialled in fresh every time.
Why the order changes the sound
Order matters because most processors react to what they're fed — so anything you fix late gets amplified by everything in between. Two examples make the whole principle obvious.
EQ before compression vs after
A compressor doesn't hear "the vocal." It reacts to level, including low-frequency rumble you can barely hear. Feed it an unfiltered vocal and that rumble triggers gain reduction on words that weren't actually loud, so the compressor pumps against noise instead of performance. Put a high-pass filter — which passes higher frequencies and attenuates the low ones — before the compressor, and it finally responds to the singing.
Now the reverse. Boost 10 kHz before a compressor and the compressor detects the extra energy and pulls it straight back down. You turned a knob and nothing happened. That's why tonal boosts belong after compression, where nothing downstream can undo them.
De-essing before compression vs after
Sibilant consonants are already the sharpest peaks in a vocal. Compress first and those peaks drive the gain reduction, so the compressor ducks entire words every time the singer hits an "s". Remove the sibilance first and the compressor gets to work on what you actually want levelled.
The rule that makes the whole order make sense: fix problems before anything amplifies them, control dynamics in the middle, and shape tone at the end — because every stage only ever sees what the previous stage handed it.
The standard vocal chain order
The conventional lead-vocal chain runs in seven stages, from clean-up to effects. Treat this as the default you deviate from deliberately, not a law — but if you're unsure, this order will not let you down.
- Clean-up and gain staging. Before a single plug-in: remove noise and clicks, trim distracting breaths, correct pitch if the take needs it, and set a sensible level. No processor repairs a bad capture.
- Subtractive EQ. High-pass the rumble, then use narrow cuts to remove boxiness and any resonance that rings out. Cutting before boosting keeps everything downstream cleaner.
- De-esser. Tame the harsh "s" and "sh" peaks now, so the compressor doesn't chase them and the tonal EQ later doesn't sharpen them.
- Compression. Level the performance so quiet words stay audible and loud ones stop jumping. Two gentle stages usually beat one aggressive one.
- Saturation. Add harmonic character and perceived loudness. This is what separates a vocal that's technically correct from one that feels present.
- Tonal EQ. Now the broad boosts — presence so the words cut through, air so the top feels open. Applied here, nothing compresses them back down.
- Delay and reverb, on sends. Not on the vocal track. Route to aux sends so the dry vocal stays clear while the effects sit behind it.
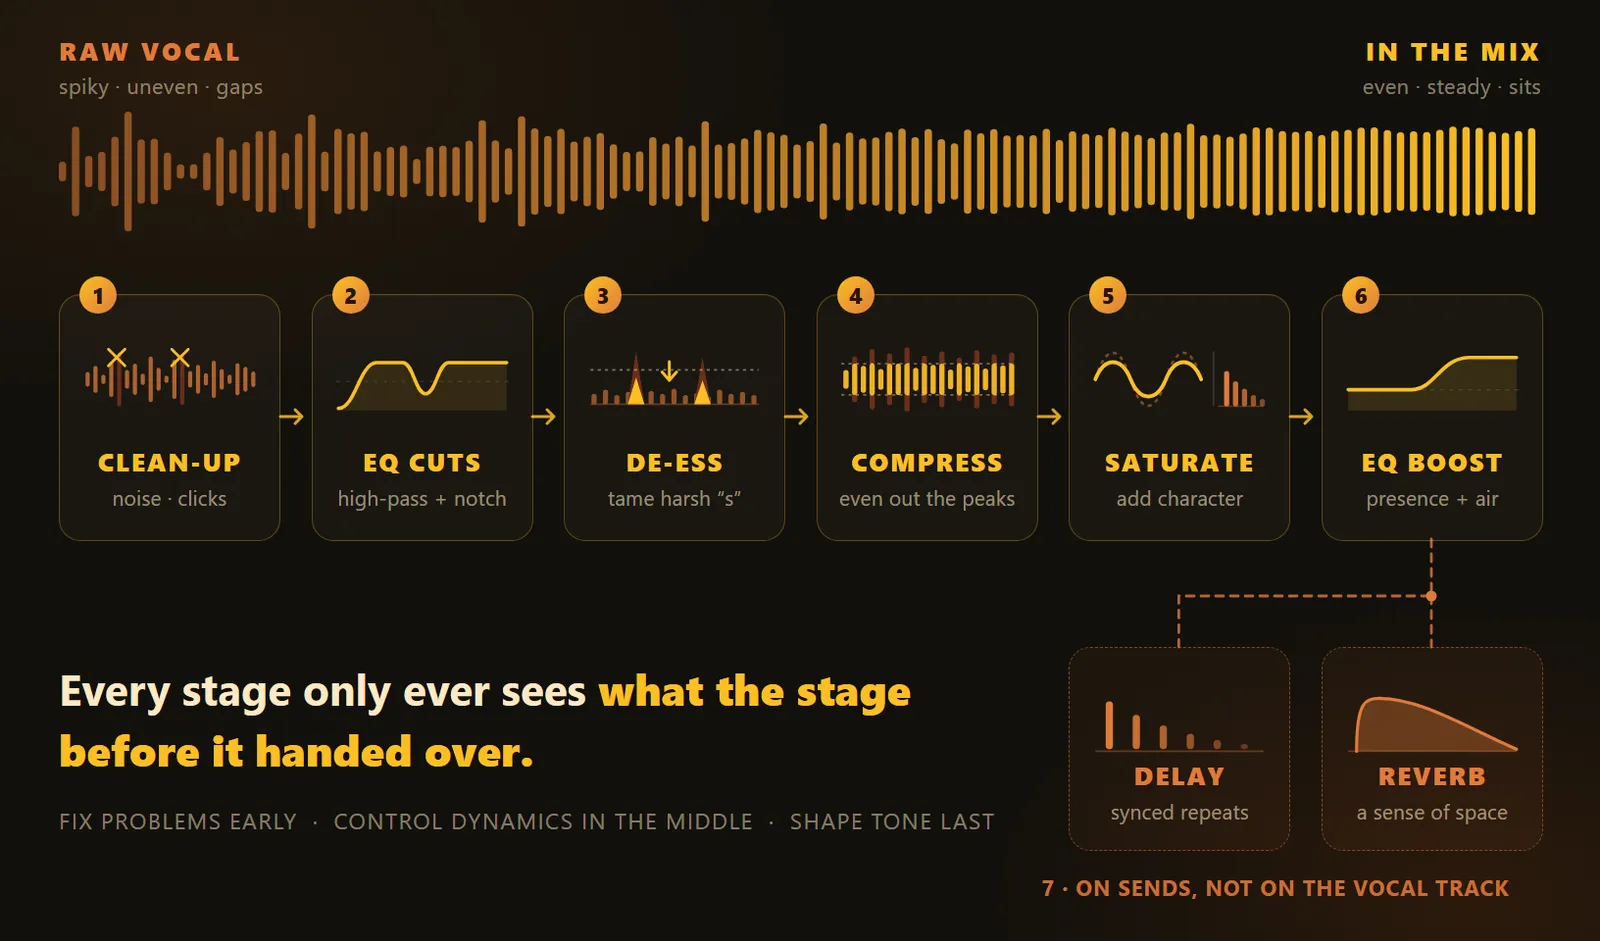
The signal only ever moves forward — which is why what you fix early determines what every later stage has to work with.
What each stage does
Clean-up and gain staging
The unglamorous stage everyone skips. Mouth clicks, chair creaks, a breath that lands louder than the line after it — these all survive the entire chain and get louder with every stage that follows.
What it's for: giving every plug-in downstream a clean, sensibly-levelled signal to react to instead of a noisy one.
Subtractive EQ
Equalization is the process of adjusting the volume of different frequency bands in a signal. Here you're only using it to take things away: rumble below the voice, the boxy congestion in the low mids, and any single frequency that rings.
What it's for: removing problems while they're still small, so the compressor reacts to the performance rather than to noise.
De-esser
De-essing is any technique that reduces the excessive prominence of sibilant consonants — the sounds written as s, z, ch, j, t and sh. Sibilance sits anywhere between roughly 2 and 10 kHz depending on the voice, which is why a fixed setting rarely works across singers.
What it's for: removing harshness without dulling the whole vocal, which a broad EQ cut would do.
Compression
Dynamic range compression reduces the volume of loud sounds or amplifies quiet ones, narrowing the signal's dynamic range. Four controls do the work: threshold (the level above which the compressor starts working), ratio (how hard it pulls — at 4:1, a signal 4 dB over the threshold comes out 1 dB over), attack (how quickly it clamps down), and release (how quickly it lets go).
What it's for: making a performance sit steadily — the difference between a vocal you keep reaching for the fader on and one that stays put.
Two gentler stages usually beat one hard one: a first compressor catching the fastest peaks, a second levelling more slowly underneath. Each does a few decibels instead of one doing ten, and the result breathes instead of squashing.
Saturation
Saturation adds harmonic content the original signal didn't have. It's the least technical stage and often the one that makes the biggest perceptual difference, because those added harmonics make a vocal read as louder and closer without actually raising its level.
What it's for: character and presence — turning a clean, correct vocal into one that sounds like a record.
Tonal EQ
Same tool as stage two, opposite job. Broad, gentle boosts: presence to make consonants cut through a dense arrangement, air at the very top for openness. Because this sits after the compressor, what you boost stays boosted.
What it's for: the final tonal identity of the vocal, set in context against the full mix rather than soloed.
Delay and reverb
Reverberation is the persistence of sound after it's produced — reflections arriving so close together the ear hears one decaying wash rather than separate repeats. A distinct echo needs roughly 50 to 100 ms of separation to register as its own event; anything tighter blurs into reverb. That gap is exactly the difference between a delay you hear as a repeat and a space you hear as a room.
What it's for: placing the vocal at a believable distance and giving it a sense of space, without smearing the words.
Both belong on aux sends rather than inserted on the vocal track. Sends keep the dry signal untouched and intelligible, let you EQ or compress the effect return separately, and let several tracks share one space so the mix sounds like one room instead of five. For tempo-locked repeats you'll need the song's tempo — you can detect a track's BPM if you don't already have it.
If you'd rather see the ordering argument demonstrated with audio than read it, this walkthrough covers exactly that:
Starting settings, stage by stage
These are starting points to adjust by ear, not presets — every voice needs different numbers. Use them to get in the neighbourhood quickly, then judge everything against the full mix.
| Stage | Start around | What tells you it's wrong |
|---|---|---|
| High-pass filter | Sweep up until the vocal thins, then back off — often somewhere in the 80–120 Hz region | Vocal loses weight and chest; or rumble still moves the compressor |
| Boxiness cut | A narrow cut in the low mids, found by sweeping a boost until it sounds worst, then cutting there | Vocal sounds hollow and disconnected from the body of the voice |
| De-esser | Sibilance sits roughly 2–10 kHz by voice; commonly nearer 3–6 kHz for lower voices and 6–8 kHz for higher | "S" sounds turn into a lisp, or the top of the vocal dulls |
| Compressor ratio | Around 3:1 to 4:1 for a natural lead vocal | Vocal sounds squashed and lifeless, or still jumps in level |
| Compressor threshold | Set so the loudest words show roughly 3–6 dB of gain reduction | Meter pinned constantly, or barely moving at all |
| Attack | Slow enough to let consonants through before it clamps | Words lose their front edge and consonants go soft |
| Release | Fast enough to recover before the next word arrives | Audible pumping, or the level never settles between lines |
| Presence boost | A broad, gentle lift where the words start cutting through | Harshness returns, or the vocal turns brittle |
| Reverb send | Raise until you hear it, then back off until you only notice when it's muted | Words blur, or the vocal floats detached from the track |
Sibilance and compressor-behaviour figures reflect the ranges described in the referenced sources; all other values are widely used starting points, not measurements.
How to build your chain
Five moves, in order. This works with stock plug-ins in any DAW — you do not need to buy anything.
- Fix the recording first. Edit noise and distracting breaths, set a healthy level. Every minute here saves ten later, because a chain amplifies problems as readily as it amplifies the voice.
- Cut before you boost. High-pass, then hunt the one or two frequencies that ring. Sweep a narrow boost until it sounds actively bad, then cut at that spot.
- Level the performance. Add compression aiming for a few decibels of gain reduction on the loudest words. If you need much more than that, the take needs volume automation, not a harder ratio.
- Shape the tone last. Presence and air after the compressor, saturation for character. Every judgement made with the full track playing — never soloed.
- Place effects on sends, then automate. Delay and reverb on aux returns. Then ride the vocal level through the song so no line ever disappears — automation fixes what compression can't.
A four-plug-in chain you can build today: EQ (high-pass + one narrow cut) → De-esser → Compressor (3:1, aim 3–6 dB reduction) → EQ (broad presence lift) → send to Reverb and Delay. Everything here is stock in every DAW. Build this before you buy anything — if a vocal doesn't sit with these four in this order, another plug-in won't be what fixes it.
Vocal chains by genre
The order stays the same across genres; what changes is how hard each stage is pushed. These are tendencies, not requirements — plenty of great records ignore them.
| Genre | Character aimed for | Where the chain leans |
|---|---|---|
| Pop | Bright, forward, immediate | Firm compression, generous presence and air, short tight reverb |
| Hip-hop / rap | Aggressive, dry, in your face | Heavier compression and saturation, minimal reverb, slap delay |
| Rock | Raw, energetic, textured | Saturation for grit, less clinical de-essing, room-style reverb |
| Singer-songwriter / acoustic | Natural, intimate, dynamic | Light compression, minimal EQ, longer and softer reverb |
| Ballad | Wide, emotional, spacious | Gentle compression plus heavy automation, long lush reverb |
| Electronic / dance | Processed, effected, part of the texture | Strong compression, creative effects, vocal treated as an instrument |
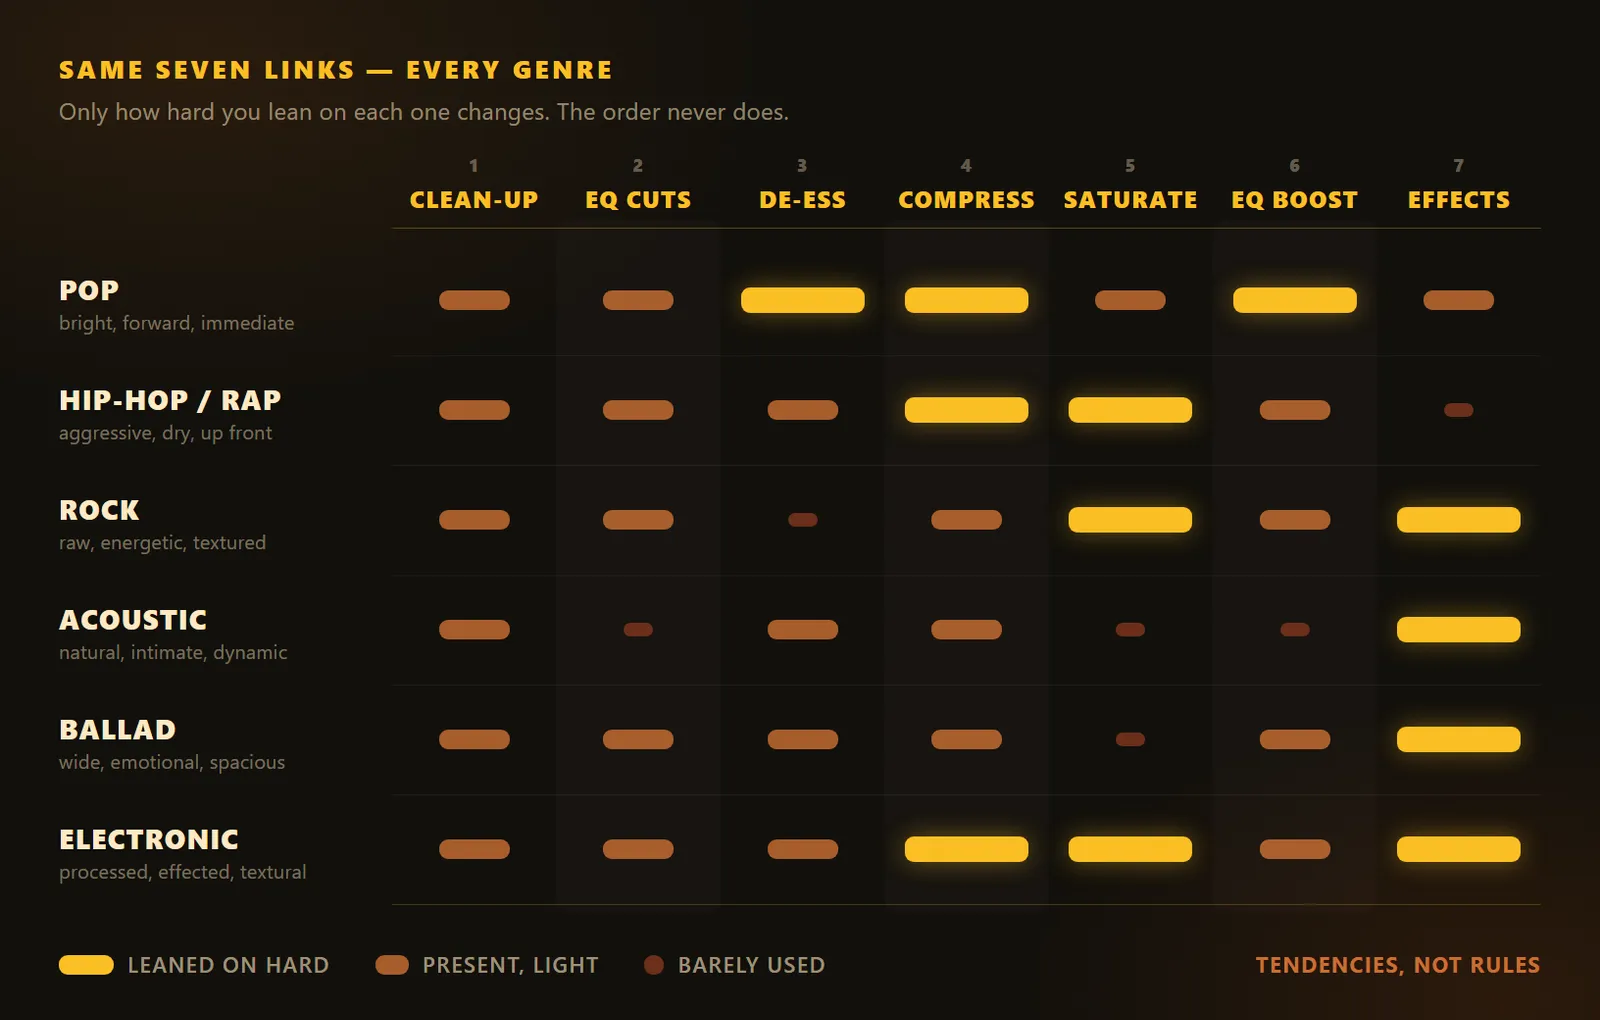
Same seven links every time — genre decides which ones you lean on, not which ones exist.
Common vocal chain mistakes (and what to do instead)
- "More plug-ins means a better vocal." Four in the right order beats twelve in the wrong one. Every stage you add is another chance to make things worse.
- "Boost until it sounds bright enough." Cut what's in the way first. A vocal usually needs space cleared around it more than it needs more of itself.
- "Reverb makes a vocal sound professional." Reverb placed badly makes it sound distant and unintelligible. Start with less than feels right and let it hide behind the dry signal.
- "A great chain fixes a mediocre take." Nothing in the chain adds emotion that wasn't performed. The single highest-leverage move in vocal production is another take.
How to check your work
- Check on more than one system. Phone speakers and earbuds reveal harshness and buried words that studio monitors politely hide.
- Compare at matched loudness. Bypassing the chain always sounds worse simply because it's quieter — match levels before you judge whether it helped.
- Rest your ears. Sibilance and harshness are the first things ear fatigue stops you hearing, and the first things listeners notice.
Where MuseGen fits
Straight answer: MuseGen doesn't build vocal chains, and it isn't a mixing tool. It's an all-in-one AI creation tool that produces finished songs — vocals included, already sitting in the track. That's a different job from the one this article describes, and if your goal is to learn mixing, you want a DAW and the seven stages above.
Where it's genuinely useful is earlier, at the idea stage. You can draft structured lyrics, turn the idea into a complete song, and hear how a topline actually sits over an arrangement before you commit a session to recording it. Exports are royalty-free WAV or MP3 (check MuseGen's current terms before commercial use), and you can generate a music video once a track lands.
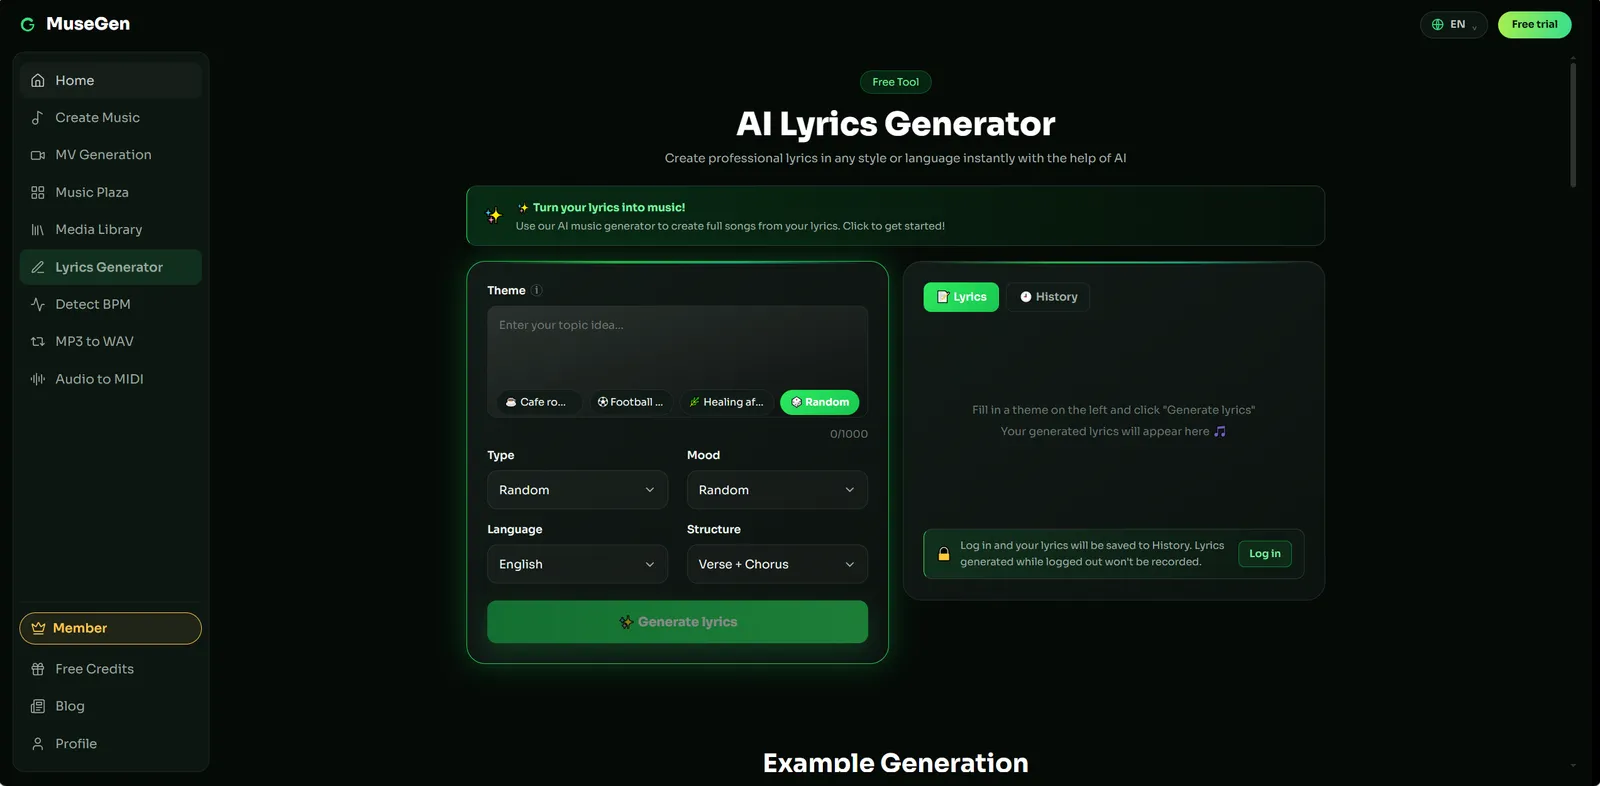
Step 1 — draft the lyric with a real song structure.

Step 2 — hear the topline in a finished arrangement.
One honest limitation worth stating plainly, because it's exactly what this article needs: a vocal chain requires an isolated vocal track. Generated songs currently export as a stereo mix, so there's no separate vocal to process. Stem and multitrack export is coming soon. If you just need a lossless file to work with, you can convert an MP3 to WAV.
Hear the topline before you record it. Draft the lyric, generate the song, and find out whether the idea works before you book a session. → Make a song with MuseGen
FAQ
What is a vocal chain?
A vocal chain is the ordered series of processors a recorded vocal passes through during mixing. Signal enters at the first device and leaves the last one changed by everything before it, which is why the order is part of the sound. A typical chain runs clean-up, subtractive EQ, de-esser, compression, saturation, tonal EQ, and then delay and reverb on sends.
What order should a vocal chain be in?
The most widely used order is clean-up and gain staging, then subtractive EQ, then a de-esser, then compression, then saturation, then tonal EQ, with delay and reverb on separate aux sends. The logic is simple: remove problems before anything amplifies them, control the dynamics in the middle, and shape the final tone at the end.
What plugins do I need for a vocal chain?
Four cover almost everything: an EQ, a compressor, a de-esser, and a reverb, with a delay close behind. Every DAW includes all of these as stock plug-ins, and they're genuinely good enough for a professional-sounding vocal. Buying more plug-ins doesn't fix a chain that's in the wrong order or a recording that was captured badly.
Should EQ come before or after compression?
Both, and they do different jobs. Subtractive EQ goes before the compressor so that rumble and harsh resonances don't trigger it, otherwise the compressor reacts to problems instead of to the performance. Tonal EQ goes after the compressor, because boosts applied before it would simply be compressed back down.
What are good starting compressor settings for vocals?
A common starting point is a ratio around 3:1 to 4:1, a threshold set so the loudest words show roughly 3 to 6 dB of gain reduction, a medium attack that lets consonants through, and a release that recovers before the next word. These are starting points rather than rules — the correct setting is whatever makes the vocal sit steadily in the track, judged by ear against the full mix.
Do I need a de-esser?
Only if the vocal has harsh sibilance, but most bright vocals do once they've been compressed and brightened. Sibilance sits anywhere between roughly 2 and 10 kHz depending on the voice, and a de-esser reduces it without dulling the rest of the performance. Place it before the compressor so the compressor isn't reacting to the peaks you're about to remove.
Should reverb go on the vocal track or a send?
On a send, in nearly every case. Putting reverb and delay on aux sends keeps the dry vocal clear and intelligible while the effects sit behind it, lets you process the effect return separately, and lets several tracks share one space. Inserting reverb directly on the vocal track washes out the dry signal and gives you far less control.
Keep reading
- What Is a DAW in Music? Digital Audio Workstations Explained
- What Is Audio Mastering? A Clear Guide to Music's Final Step
- What Is BPM in Music? A Beginner's Guide to Tempo & Beats Per Minute
Sources
- Wikipedia — "Dynamic range compression" for threshold, ratio, attack, and release.
- Wikipedia — "Equalization (audio)" for EQ and high-pass filtering.
- Wikipedia — "De-essing" for sibilance and its frequency ranges.
- Wikipedia — "Reverberation" for reverb versus a distinct echo.
- Mastering.com — "Vocal Chain Order Matters" (video) for why plug-in order changes the result.